前言
官方默认搭建的文档是1控制1计算,实际1个计算节点肯定是不行的,这篇文章将基于openstack集群进行增加计算节点,如果是已经正确的搭建过一次1控制1计算的openstack则本文实操起来应该并不难,因为需要安装的组件就两个,下面开始。(S版本)
环境配置
环境是一台CentOS7.9的机器,然后selinux和firewalld都是关闭的,因为条件有限配置是1H1G的配置。
网络环境
主机名为compute2。修改网络内全部的hosts文件,如果有dns则更好
[root@compute2 ~]# cat /etc/hosts
127.0.0.1   localhost localhost.localdomain localhost4 localhost4.localdomain4
::1         localhost localhost.localdomain localhost6 localhost6.localdomain6
# controller
10.0.0.11       controller

# compute1
10.0.0.31       compute1
10.0.0.32       compute2
时间同步
执行下面命令设置时区以及安装chrony
[root@compute2 ~]# timedatectl set-timezone Asia/Shanghai
[root@compute2 ~]# yum -y install chrony
参考下面配置
[root@compute2 ~]# cat /etc/chrony.conf |egrep -v "^#|^$"
server controller iburst
driftfile /var/lib/chrony/drift
makestep 1.0 3
rtcsync
logdir /var/log/chrony
[root@compute2 ~]#
重启服务
[root@compute2 ~]# systemctl restart chronyd执行命令chronyc sources查看
基础软件包
我这里是安装s版本的openstack,参考文档地址: https://docs.openstack.org/install-guide/environment-packages-rdo.html
所有主机都执行下面命令,用来安装openstack对应的yum仓库。
yum install -y centos-release-openstack-stein在24年12月28日,他自己的这些源有一部分是不可以用的,通过下面命令进行替换阿里的镜像站
cd /etc/yum.repos.d
sed -i 's/mirrorlist=/#mirrorlist=/g' *.repo
sed -i 's/#baseurl=/baseurl=/g' *.repo
sed -i 's/mirror.centos.org/mirrors.aliyun.com/g' *.repo
安装openstack的客户端管理工具
yum install python-openstackclient -y 组件安装
Nova - 计算组件
下面的操作是在计算节点中操作,文档参考: https://docs.openstack.org/nova/stein/install/compute-install-rdo.html
下面开始安装组件
yum install -y openstack-nova-compute下面开始修改配置
# 备份
cp /etc/nova/nova.conf{,.bak}
# 去除空行和注释
egrep -v "^$|^#" /etc/nova/nova.conf.bak > /etc/nova/nova.conf编辑配置/etc/nova/nova.conf,主要修改下面内容
[DEFAULT]
use_neutron = true
firewall_driver = nova.virt.firewall.NoopFirewallDriver
my_ip = 10.0.0.32
enabled_apis = osapi_compute,metadata
transport_url = rabbit://openstack:RABBIT_PASS@controller
[api]
auth_strategy = keystone
[glance]
api_servers = http://controller:9292
[keystone_authtoken]
auth_url = http://controller:5000/v3
memcached_servers = controller:11211
auth_type = password
project_domain_name = Default
user_domain_name = Default
project_name = service
username = nova
password = NOVA_PASS
[oslo_concurrency]
lock_path = /var/lib/nova/tmp
[placement]                                                                        region_name = RegionOne
project_domain_name = Default
project_name = service
auth_type = password
user_domain_name = Default
auth_url = http://controller:5000/v3
username = placement
password = PLACEMENT_PASS
[vnc]                                                                              enabled = true
server_listen = 0.0.0.0
server_proxyclient_address = $my_ip
novncproxy_base_url = http://controller:6080/vnc_auto.html要注意的是my_ip这里需要改成自己的ip。
启动服务
systemctl enable --now libvirtd.service openstack-nova-compute.service然后验证参考链接: https://docs.openstack.org/nova/stein/install/compute-install-rdo.html#add-the-compute-node-to-the-cell-database
每次加计算节点的时候都需要在控制节点执行
su -s /bin/sh -c "nova-manage cell_v2 discover_hosts --verbose" nova这是用来发现主机的,如果不想手动去执行,则可以在nova的控制节点配置中添加这段配置
[scheduler]
discover_hosts_in_cells_interval = 300
Neutron - 网络组件
参考文档: https://docs.openstack.org/neutron/stein/install/compute-install-rdo.html
安装组件
yum install -y openstack-neutron-linuxbridge ebtables ipset备份配置
# 备份
cp /etc/neutron/neutron.conf{,.bak}
cp /etc/neutron/plugins/ml2/linuxbridge_agent.ini{,.bak}
# 去除空行和注释
egrep -v "^$|^#" /etc/neutron/neutron.conf.bak > /etc/neutron/neutron.conf
egrep -v "^$|^#" /etc/neutron/plugins/ml2/linuxbridge_agent.ini.bak > /etc/neutron/plugins/ml2/linuxbridge_agent.ini编辑配置/etc/neutron/neutron.conf主要修改内容如下
[DEFAULT]                                                                          transport_url = rabbit://openstack:RABBIT_PASS@controller                          auth_strategy = keystone
[keystone_authtoken]                                                               www_authenticate_uri = http://controller:5000
auth_url = http://controller:5000
memcached_servers = controller:11211
auth_type = password
project_domain_name = default
user_domain_name = default
project_name = service
username = neutron
password = NEUTRON_PASS
[oslo_concurrency]
lock_path = /var/lib/neutron/tmp下面配置ml2模块,编辑/etc/neutron/plugins/ml2/linuxbridge_agent.ini,主要内容和控制节点的一样,直接复制也行,主要内容如下
[linux_bridge]
physical_interface_mappings = provider:ens33
[vxlan]
enable_vxlan = false
[securitygroup]
enable_security_group = true
firewall_driver = neutron.agent.linux.iptables_firewall.IptablesFirewallDriver
下面开始加载系统模块,
echo "br_netfilter" >> /etc/modules-load.d/bridge.conf
modprobe br_netfilter配置sysctl,编辑/etc/sysctl.conf
net.bridge.bridge-nf-call-iptables = 1
net.bridge.bridge-nf-call-ip6tables = 1执行sysctl -p重载
下面在计算节点的计算模块对接一下,编辑/etc/nova/nova.conf,主要修改内容如下
[neutron]
url = http://controller:9696
auth_url = http://controller:5000
auth_type = password
project_domain_name = default
user_domain_name = default
region_name = RegionOne
project_name = service
username = neutron
password = NEUTRON_PASS重启计算节点的nova服务
systemctl restart openstack-nova-compute.service启动计算节点的neutron模块
systemctl enable --now neutron-linuxbridge-agent.service其他配置
因为系统是centos7.9默认虚机模拟硬件是rhel7.6,这个是用不了的,实例开机会出现Booting from Hard Disk...的问题,要解决这个问题可以参考这篇文章的问题解决,这里直接做修改
修改nova计算节点的配置文件/etc/nova/nova.conf,修改内容如下
# libvirt 段增加
[libvirt]
hw_machine_type=x86_64=pc-i440fx-rhel7.2.0
修改之后重启服务
systemctl restart libvirtd openstack-nova-compute成果验证
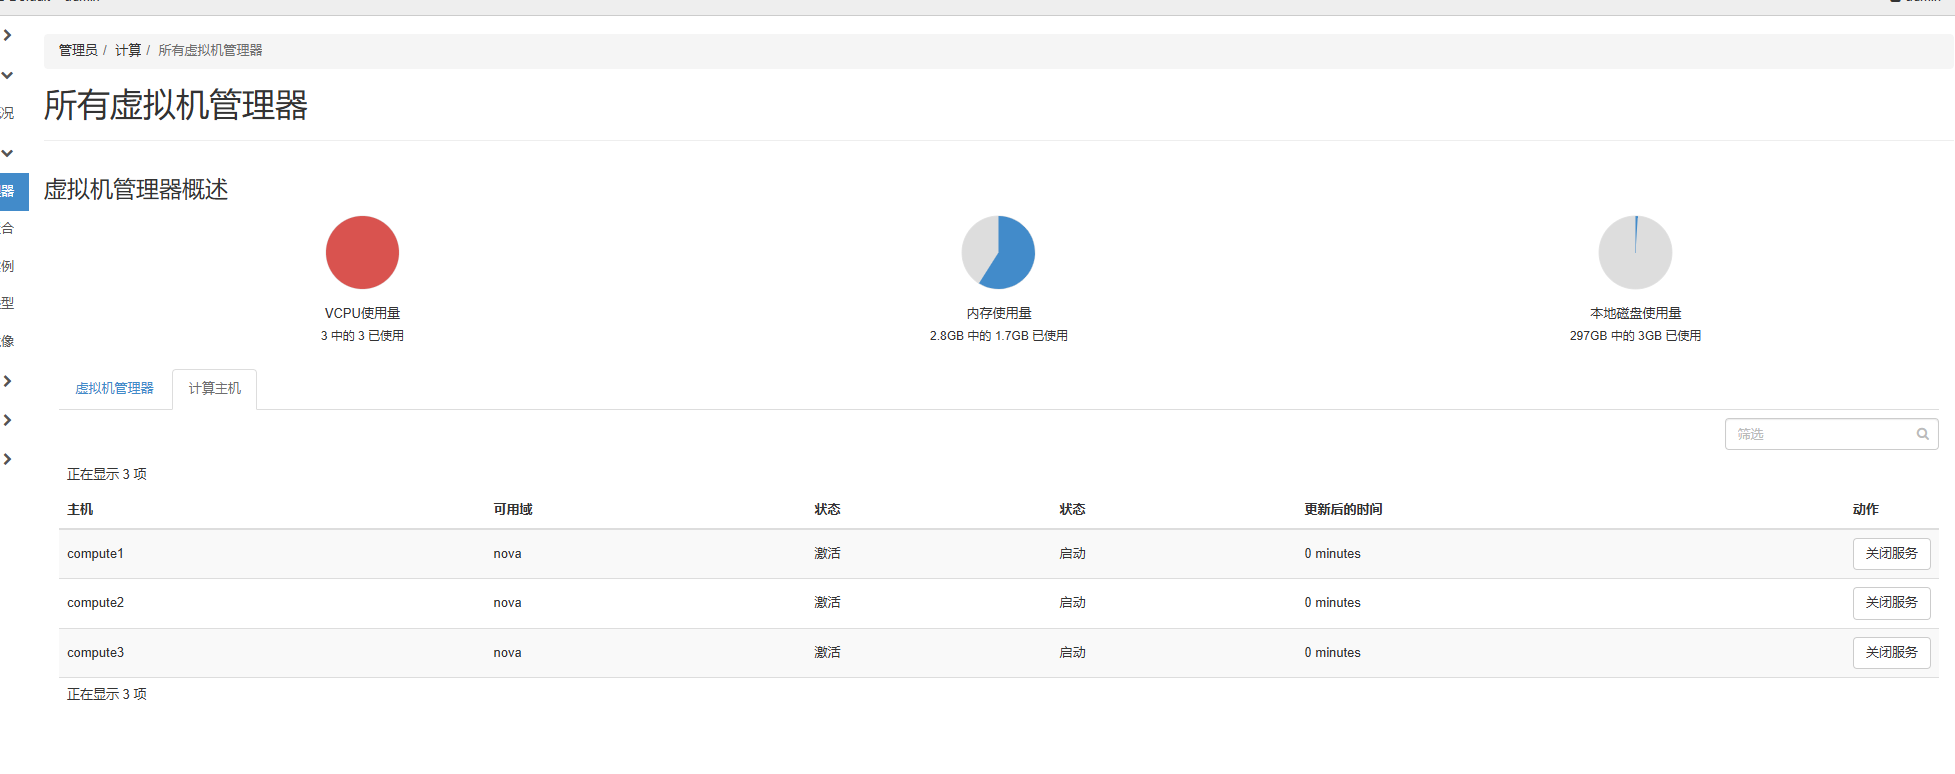
此时去仪表盘中查看计算节点的主机列表
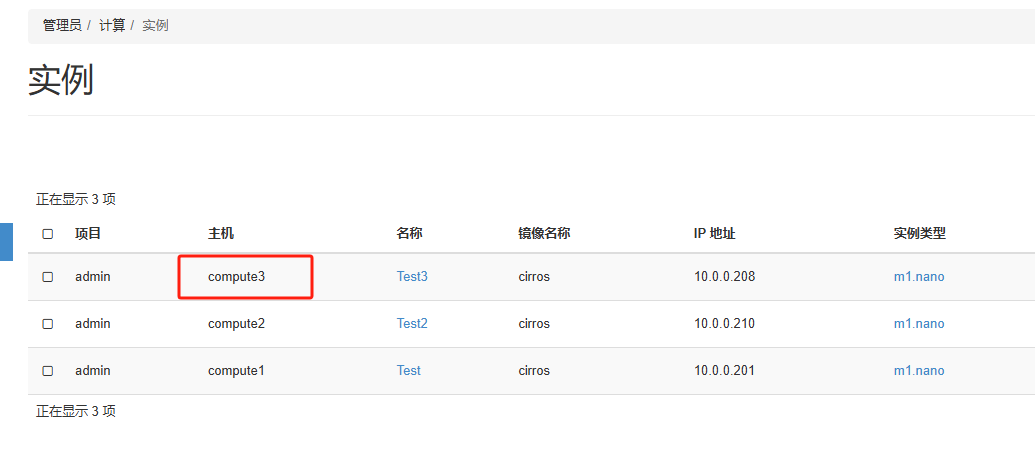
确保实例是运行在第二台机器上的
编写自动脚本
增加计算节点的操作并不多,这里可以直接编写自动脚本实现加节点的操作,脚本如下
要注意的是,这个脚本是基于我当前环境做的,自己用请根据实际情况来编写,我这个只能作为一个参考,编写脚本的时候一开始我认为应该多写一些判断和信息输出,写了一会发现对于我当前的环境写这么多判断和输出意义不大,所以后面就没怎么加了,所以我这个只能作为参考不建议直接拿来用,请根据自己的情况来编写
#!/bin/bash
# 判断比较简单,只提供参考,不建议直接用,请根据实际情况修改
hostname="compute3"
eth_name="ens33"
ip=`ip -4 addr show $eth_name | grep inet | awk '{ print $2 }' | cut -d'/' -f1`

set_chrony() {
    if ! rpm -q chrony > /dev/null 2>&1; then
        echo "[INSTALL]安装chrony中..."
        yum -y install chrony > /dev/null 2>&1
        if ! rpm -q chrony > /dev/null 2>&1; then
            echo "[ERROR]: Chrony安装失败"
            exit 1
        else
            echo "[INSTALL] Chrony 安装成功"
        fi
    else
        echo "[INSTALL] Chrony 已经安装"
    fi
    cp /etc/chrony.conf{,.bak}
    cat << EOF > /etc/chrony.conf
server controller iburst
driftfile /var/lib/chrony/drift
makestep 1.0 3
rtcsync
logdir /var/log/chrony
EOF
    systemctl enable chronyd
    systemctl restart chronyd
}

install_base_package(){
    yum install -y centos-release-openstack-stein > /dev/null 2>&1
    cd /etc/yum.repos.d
    sed -i 's/mirrorlist=/#mirrorlist=/g' *.repo
    sed -i 's/#baseurl=/baseurl=/g' *.repo
    sed -i 's/mirror.centos.org/mirrors.aliyun.com/g' *.repo
    yum install python-openstackclient -y  > /dev/null 2>&1
}

install_nova() {
yum install -y openstack-nova-compute > /dev/null 2>&1
cp /etc/nova/nova.conf{,.bak}
egrep -v "^$|^#" /etc/nova/nova.conf.bak > /etc/nova/nova.conf
cat << EOF > /etc/nova/nova.conf
[DEFAULT]
use_neutron = true
firewall_driver = nova.virt.firewall.NoopFirewallDriver
my_ip = $ip
enabled_apis = osapi_compute,metadata
transport_url = rabbit://openstack:RABBIT_PASS@controller
[api]
auth_strategy = keystone
[api_database]
[barbican]
[cache]
[cells]
[cinder]
[compute]
[conductor]
[console]
[consoleauth]
[cors]
[database]
[devices]
[ephemeral_storage_encryption]
[filter_scheduler]
[glance]
api_servers = http://controller:9292
[guestfs]
[healthcheck]
[hyperv]
[ironic]
[key_manager]
[keystone]
[keystone_authtoken]
auth_url = http://controller:5000/v3
memcached_servers = controller:11211
auth_type = password
project_domain_name = Default
user_domain_name = Default
project_name = service
username = nova
password = NOVA_PASS
[libvirt]
hw_machine_type=x86_64=pc-i440fx-rhel7.2.0
[metrics]
[mks]
[neutron]
url = http://controller:9696
auth_url = http://controller:5000
auth_type = password
project_domain_name = default
user_domain_name = default
region_name = RegionOne
project_name = service
username = neutron
password = NEUTRON_PASS
[notifications]
[osapi_v21]
[oslo_concurrency]
lock_path = /var/lib/nova/tmp
[oslo_messaging_amqp]
[oslo_messaging_kafka]
[oslo_messaging_notifications]
[oslo_messaging_rabbit]
[oslo_middleware]
[oslo_policy]
[pci]
[placement]
region_name = RegionOne
project_domain_name = Default
project_name = service
auth_type = password
user_domain_name = Default
auth_url = http://controller:5000/v3
username = placement
password = PLACEMENT_PASS
[placement_database]
[powervm]
[privsep]
[profiler]
[quota]
[rdp]
[remote_debug]
[scheduler]
[serial_console]
[service_user]
[spice]
[upgrade_levels]
[vault]
[vendordata_dynamic_auth]
[vmware]
[vnc]
enabled = true
server_listen = 0.0.0.0
server_proxyclient_address = \$my_ip
novncproxy_base_url = http://controller:6080/vnc_auto.html
[workarounds]
[wsgi]
[xenserver]
[xvp]
[zvm]
EOF
systemctl enable --now libvirtd.service openstack-nova-compute.service
}

install_neutron() {
    yum install -y openstack-neutron-linuxbridge ebtables ipset > /dev/null 2>&1
    cp /etc/neutron/neutron.conf{,.bak}
    cp /etc/neutron/plugins/ml2/linuxbridge_agent.ini{,.bak}
    egrep -v "^$|^#" /etc/neutron/neutron.conf.bak > /etc/neutron/neutron.conf
    egrep -v "^$|^#" /etc/neutron/plugins/ml2/linuxbridge_agent.ini.bak > /etc/neutron/plugins/ml2/linuxbridge_agent.ini
    cat << EOF > /etc/neutron/neutron.conf
[DEFAULT]
transport_url = rabbit://openstack:RABBIT_PASS@controller
auth_strategy = keystone
[cors]
[database]
[keystone_authtoken]
www_authenticate_uri = http://controller:5000
auth_url = http://controller:5000
memcached_servers = controller:11211
auth_type = password
project_domain_name = default
user_domain_name = default
project_name = service
username = neutron
password = NEUTRON_PASS
[oslo_concurrency]
lock_path = /var/lib/neutron/tmp
[oslo_messaging_amqp]
[oslo_messaging_kafka]
[oslo_messaging_notifications]
[oslo_messaging_rabbit]
[oslo_middleware]
[oslo_policy]
[privsep]
[ssl]
EOF
    cat << EOF > /etc/neutron/plugins/ml2/linuxbridge_agent.ini
[DEFAULT]
[linux_bridge]
physical_interface_mappings = provider:ens33
[vxlan]
enable_vxlan = false
[securitygroup]
enable_security_group = true
firewall_driver = neutron.agent.linux.iptables_firewall.IptablesFirewallDriver
EOF
    echo "br_netfilter" >> /etc/modules-load.d/bridge.conf
    modprobe br_netfilter
    echo "net.bridge.bridge-nf-call-iptables = 1 " > /etc/sysctl.conf
    echo "net.bridge.bridge-nf-call-ip6tables = 1" > /etc/sysctl.conf
    sysctl -p
    systemctl enable --now neutron-linuxbridge-agent.service
}
# 检查
if [ -z "$eth_name" ] || [ -z "$ip" ]; then
    echo "ip获取失败,请检查网卡名字和ip"
    exit 1
fi

set_chrony
install_base_package
install_nova
install_neutron

echo "安装成功"
验证结果

